최근 Kakao Map Api를 React Component 라이브러리로 개발을 진행하며 자주 사용하게 된 ReactDom의 Portal 기능에 대해서 공부를 하면서 Render와 어떠한 차이점이 있는지 그리고 활용방안에 대해서 정리 해보았습니다!
Portal 이란?
ReactDom의 Portal 기능은 부모 컴포넌트의 DOM 계층 구조 바깥에 있는 DOM 노드로 자식을 렌더링 하는 기능을 제공합니다.
즉 외부에 존재하는 DOM 노드가 React App DOM 계층 안에 존재하는 것처럼 연결을 해주는 포탈 기능을 제공합니다.
이렇게 createPortal()로 연결된 경우에도 컴포넌트 생명주기(Component LifeCycle) 와 합성 이벤트(SyntheticEvent) 이 적용이 됩니다.
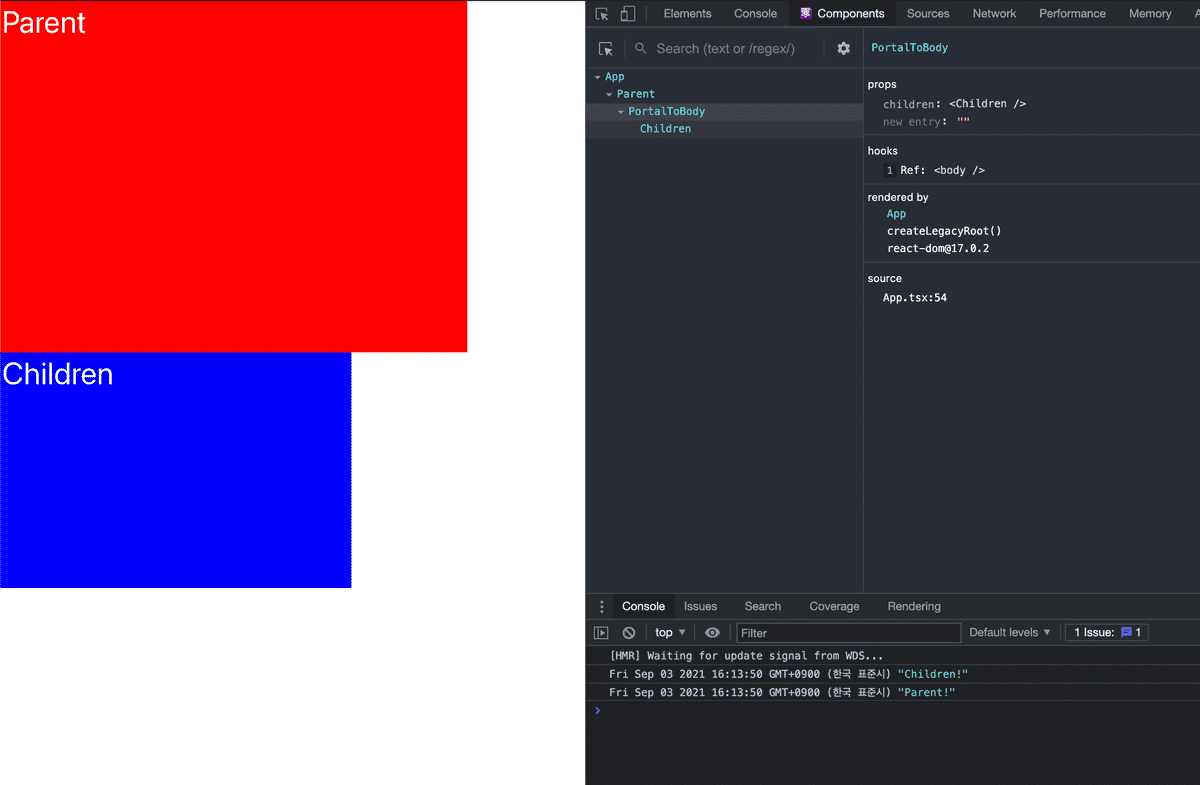
아래와 같이 예시를 작성하고 Children 에 해당하는 컴포넌트에 onClick 이벤트를 발생시 이벤트 버블링 이 적용이 되어 Parent 에 대한 onClick 이벤트가 발생하는 것을 볼 수 있습니다.
import React, { useRef } from "react"
import ReactDom from "react-dom"

const PortalToBody: React.FC = ({ children }) => {
  const container = useRef(document.body)
  return ReactDom.createPortal(children, container.current)
}

const Parent: React.FC = ({ children }) => {
  const handleClick = () => console.log("Parent!")

  return (
    <div
      style={{
        width: "480px",
        height: "360px",
        border: "2px solid red",
        backgroundColor: "red",
        color: "white",
        fontSize: "2rem",
      }}
      onClick={handleClick}
    >
      Parent
      {children}
    </div>
  )
}

const Children: React.FC = () => {
  const handleClick = () => console.log("Children!")

  return (
    <div
      style={{
        width: "360px",
        height: "240px",
        border: "2px solid blue",
        backgroundColor: "blue",
        color: "white",
        fontSize: "2rem",
      }}
      onClick={handleClick}
    >
      Children
    </div>
  )
}

const App = () => {
  return (
    <div className="App">
      <Parent>
        <PortalToBody>
          <Children />
        </PortalToBody>
      </Parent>
    </div>
  )
}

export default App

실제로 Children 에 대한 컴포넌트는 실제 Dom 위치는 body 안에 있지만 React의 Component Tree 상에서는 App 하위에 존재하는 것을 React Development Tool를 통해 확인 할 수 있습니다.
또한 해당 Children 의 클릭 이벤트 발생을 시키면 이벤트 버블링이 발생하여 Parent 의 이벤트 까지 발생 하는 것을 볼 수 있습니다.
Portal의 활용 방안!
Portal은 React 생명주기와 밀접한 연관이 있기 때문에 기존 Dom를 다루는 JavaScript 라이브러리와 함께 사용을 할 때 유용하게 사용 하거나 Modal과 같은 기능을 구현 할 때 활용 할 수 있습니다.
Kakao Map 과 같이 특정 Dom에 렌더링을 시키거나 자체적으로 Dom를 관리 하는 경우 Portal 를 이용하여 해당 관리 함수를 React Component으로 랩핑하여 React의 life cycle과 함께 사용할 수 있습니다.
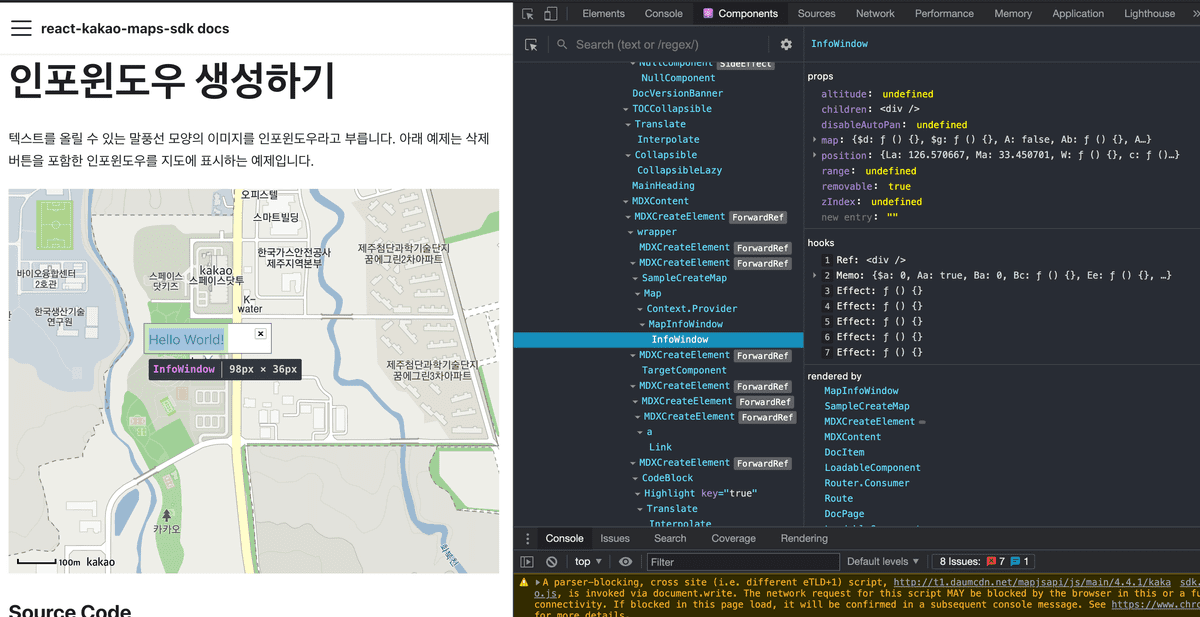
아래는 간단하게 Kakao Map 의 InfoWindow 기능을 React 컴포넌트로 랩핑한 예시 입니다.
import React, { useEffect, useMemo, useRef } from "react"
import ReactDom from "react-dom"

interface InfoWindowProps {
  map: kakao.maps.Map | kakao.maps.Roadview
  position: kakao.maps.LatLng | kakao.maps.Viewpoint
  marker?: kakao.maps.Marker
  /**
   * 인포윈도우를 열 때 지도가 자동으로 패닝하지 않을지의 여부
   * @default false
   */
  disableAutoPan?: boolean

  /**
   * 인포윈도우 엘리먼트의 z-index 속성 값
   */
  zIndex?: number

  /**
   * 로드뷰에 올라있는 인포윈도우의 높이 값(m 단위)
   */
  altitude?: number

  /**
   * 로드뷰 상에서 인포윈도우의 가시반경(m 단위), 두 지점 사이의 거리가 지정한 값보다 멀어지면 인포윈도우는 보이지 않게 된다
   */
  range?: number

  /**
   * 인포윈도우 객체 생성후 해당 객체를 반환하는 함수
   */
  onInfoWindowCreated?: (infoWindow: kakao.maps.InfoWindow) => void
}

const InfoWindow: React.FC<InfoWindowProps> = ({
  map,
  position,
  marker,
  children,
  altitude,
  disableAutoPan,
  range,
  removable,
  zIndex,
  onInfoWindowCreated,
}) => {
  const container = useRef(document.createElement("div"))

  const infoWindow = useMemo(() => {
    const kakaoInfoWindow = new kakao.maps.InfoWindow({
      altitude: altitude,
      disableAutoPan: disableAutoPan,
      range: range,
      zIndex: zIndex,
      content: container.current,
      position: position,
    })
    if (onInfoWindowCreated) onInfoWindowCreated(kakaoInfoWindow)
    return kakaoInfoWindow
    // eslint-disable-next-line react-hooks/exhaustive-deps
  }, [])

  useEffect(() => {
    infoWindow.open(map, marker)
    return () => {
      infoWindow.close()
    }
    // eslint-disable-next-line react-hooks/exhaustive-deps
  }, [map, marker])

  useEffect(() => {
    if (!infoWindow) return
    infoWindow.setPosition(position)
  }, [infoWindow, position])

  useEffect(() => {
    if (!infoWindow || !altitude) return
    infoWindow.setAltitude(altitude)
  }, [infoWindow, altitude])

  useEffect(() => {
    if (!infoWindow || !range) return
    infoWindow.setRange(range)
  }, [infoWindow, range])

  useEffect(() => {
    if (!infoWindow || !zIndex) return
    infoWindow.setZIndex(zIndex)
  }, [infoWindow, zIndex])

  return ReactDom.createPortal(children, container.current)
}

export default InfoWindow
위 코드를 살펴 보면 kakao.maps.InfoWindow 객체를 useRef 를 통해 관리되는 HTML Div Element 를 Content로 설정하여 생성을 하고 해당 객체를 통해 useEffect를 이용하여 props 의 변화에 따른 해당 상태 변화를 전달 할 수 있습니다.
또한 children 를 content로 사용된 객체에 ReactDom.createPortal 를 통해 해당 Dom 에 렌더링이 되고 React의 컴포넌트로써 관리가 가능하게 됩니다.

Render 이란?
ReactDOM.render(element, container[, callback])React 엘리먼트를 container DOM에 렌더링 하는 함수 입니다.
단순하게 보기에는 createPortal() 과 동일하게 보이지만 이 때 주요하게 확인 해야 하는 부분은 새로운 React LifeCycle 생성 한다는 점 입니다.
그말은 즉 React Component 내부에서 해당 함수를 동작 시켜도 별개의 라이프 사이클을 가지고 있기 때문에 함수를 호출 하는 것만으로 react dom를 렌더링이 가능합니다.
사실 일반적으로는 React application 최초 생성을 하기 위해서 사용하는 함수 이지만 함수를 통해 React Component를 생성 할 수 있다 라는 점을 이용하여 아래와 같이 활용이 가능합니다.
Render의 활용 방안!
함수를 통해 React Component를 생성 할 수 있다 라는 점을 이용해서 Notification과 같은 기능을 구현이 가능합니다.
일반적으로 html상에서의 Notification 의 기능은 특정 위치에 일정 시간동안 안내 사항을 보여주는 기능이기 때문에 이 부분을 React의 LifeCycle에 종속되어서 함수를 통해 생성이 가능하도록 만든다고하면, 최상위에 Context API 를 통한 Notification 정보를 관리를 하고 가지고 있는 Notification 를 렌더링 하는 부분등 여러가지를 만들어서 사용을 해야하게 되는데, 이 때 발생하는 부분은 최상위에 Notification Context, Render 를 관리하는 컴포넌트로 감싸야 하는 부분이 있기 때문에 Dom Tree의 변화로 인한 Effect 발생, 상태관리의 어려움등 여러가지 발생합니다.
이때 ReactDOM.render() 를 이용해서 Notification 를 만든다면 기존 React의 상태와 상관 없이 새롭게 생성이 가능이 가능합니다. 단 호출한 부모의 React LifeCycle과 별개로 동작을 하기 때문에 내부에서 외부의 Context 와 같은 부분은 접근은 불가능 합니다. 하지만 함수 같은 경우는 실행이 가능하기 때문에 호출단에서 해당 함수를 작성해서 인자로 전달하여 동작 시키도록 하면 정상적으로 동작을 할 수 있습니다.
그리고 해당 React가 Notification의 기능을 다하고 사라져야 하는 경우 ReactDom.unmountComponentAtNode 를 이용하여 해당 Compnent 를 직접 unMount 하여 제거가 가능합니다.
아래의 소스코드는 위에서 설명한 부분을 실제 코드로 구현한 부분 입니다.
import React from "react"
import ReactDom from "react-dom"

let container: null | HTMLDivElement = null

const notification = (
  content: React.ReactNode | React.ReactNodeArray | string
) => {
  if (container === null) {
    container = document.createElement("div")
    container.style.display = "flex"
    container.style.flexDirection = "column-reverse"
    container.style.position = "fixed"
    container.style.bottom = "10px"
    container.style.right = "10px"
    document.body.appendChild(container)
  }

  const div = document.createElement("div")

  container.appendChild(div)

  const removeNotication = () => {
    ReactDom.unmountComponentAtNode(div)
    if (div?.parentNode) {
      div.parentNode.removeChild(div)
    }
  }

  ReactDom.render(<Notification>{content}</Notification>, div, () => {
    setTimeout(removeNotication, 1000)
  })

  return removeNotication
}

interface NotificationProps {}

const Notification: React.FC<NotificationProps> = ({ children }) => {
  return (
    <div
      style={{
        display: "flex",
        border: "1px solid #e6e6e6",
        backgroundColor: "#fff",
        borderRadius: "5px",
        padding: "10px",
        marginTop: "10px",
        minWidth: "360px",
        zIndex: 2,
      }}
    >
      {children}
    </div>
  )
}

const App = () => {
  return (
    <div className="App">
      <button
        onClick={() => {
          notification(<span>hello world!</span>)
        }}
      >
        Create Notification
      </button>
    </div>
  )
}

export default App

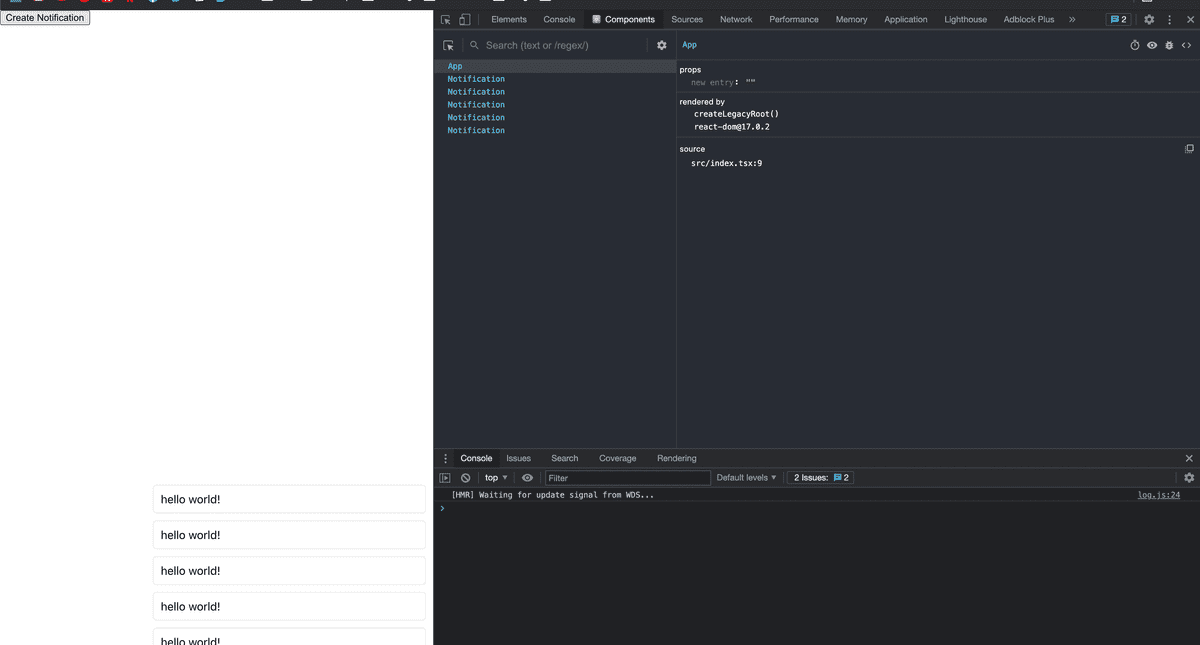
해당 notification 함수를 호출 시 위와 같이 React Component가 렌더링 되지만 최상위 APP 과 별개로 생성이 되는 것을 볼 수 있습니다.
Portal vs Render
최종적으로 아래와 같이 표를 통해 차이점과 공통점에 대해서 표로 만들어 봤습니다.
| Portal | Render | |
|---|---|---|
| 공통점 | 특정 dom으로 component를 렌더링 | 특정 dom으로 component를 렌더링 |
| 호출 위치 | React Render 내부 | 어디서든 상관 없이 함수로 호출 가능 |
| LifeCycle | 호출위치의 하위 컴포넌트로 관리됨 | 새로운 최상위 component 으로 생성됨 |
| unMount | LifeCycle에 의해 자동으로 unMount 됨 | 직접 ReactDom.unmountComponentAtNode() 함수를 사용 하여 관리 |
| event | 실제 렌더링 위치는 다르지만 부모 component의 하위 dom처럼 동작함 (버블링, 캡쳐링 발생) | 최상위 compoent 로써 동작 |
| 일반적인 활용처 | 특정 Component를 부모 외부에 Rendering 하려고 할 때 | React App를 새롭게 생성 할 때 |
